
One of the first quilting books I purchased was Maggie Malone's 5,500 Quilt Block Designs. The title says it all. There are no quilts, no instructions, just block after block. I love flipping through the pages, studying the block designs and thinking of all the possibilities. Some of the attraction is figuring out all the parts and pieces of these blocks and how they fit together.
For this series of blog posts, I thought it would be fun to take a closer look at a few of my favorites.

Many traditional blocks are based upon an underlying square grid. Identifying this grid is often the key to constructing a block that doesn't come with cutting and piecing instructions.
Quilt math works best when the finished block size is easily divisible by the defining grid!
The grid size relates to a finished square within the block. It is determined by dividing the finished block size by the number in the grid. For example, a 12" block based on a four x four grid has a grid size of three. Knowing the grid size becomes important when calculating fabric to cut. For the basic square, it's grid size + (seam allowance x 2). Now, this square might comprise of several individual fabric pieces or a single fabric might encompass more than square, but this basic square is the foundation behind many of the traditional blocks I'll be featuring.
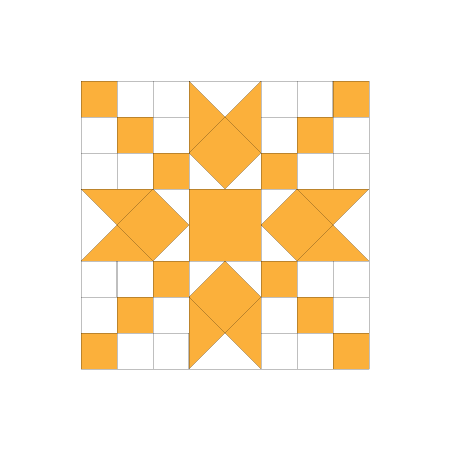

The underlying grid to this block is 8 x 8. I found it by starting with the smallest square and projecting its size equally across the entire block. The result is 64 squares, each measuring the finished block size / 8.
This is what I'll refer to as the grid size (GS).

Like many traditional blocks, Arrowhead consists of repetitive "sub-blocks". These can typically be found by locating the main seams that track full width of the block and divide the block into distinct sections. There are two in each direction, creating nine sections and three sub-block types.


Or three rows of three squares each.

Width = [GS + 1/2"] and Length = [(GS + 1/2") x (# rows)]


Option 2: flying goose / square in a square
Option 3: three flying geese (or a rectangle sandwiched by two geese)
Each of these classic units have specific sizing rules for their fabric pieces, which I won't go into here - but once assembled each unit still needs to fit within the underlying grid. Looking back at the original gridded block, the unfinished geese, for example, would be [(2 x GS) + 1/2"] wide by [GS+ 1/2"] tall.
But what's purist to do? How would block B be constructed with seam lines exactly as shown on the diagram? Here's one way mapped out:


Sizing these fabric pieces can get a little tricky, but returning to the basic square will help. Using the original grid again as a guide, the large starting square in step 1 is [(2 x grid size) + 1/2"] per side. The small triangles are a square with [GS + 1/2"] per side. This works because the stitch line divides the square in half equally. It follows that the rectangle is [(2 x GS) + 1/2"] wide by [GS+ 1/2"] tall.

As a rule of thumb, add 3/8" to the unfinished starting square for a HST (7/8" to finished size) and 3/4" for a QST (1 1/4" to finished size). Because these units are half of a half square triangle (making them akin to quarter-square triangles) unfinished squares need to be [(2 x grid size) + 1/2" + 3/4"] per side.
Two contrasting squares will make four of these half blocks - which is exactly what we need for four B-blocks. There's a catch though - two will be mirrored, which means that two of the B-blocks will need the rectangle in step 2 sewn onto the other side!
Of course, with all those points to line up, the fail-safe method may be to paper-piece!


